DIY Steel Buildings: Tips and Mistakes to Avoid (From Someone Who's Made Them)
- Aug 19, 2025
- 12 min read

Disclosure: Some of the links on this page are affiliate links, and I may earn a commission if you click through and make a purchase.
A steel building is a big investment of both money and, if you've decided to build it yourself, time and labor. So, take care in deciding on a design and consider these tips, based on our own experience with a (supposedly) do-it-yourself steel building, even before you start shopping around.
Choosing Your Building: Styles, Designs, and Quotes
Before settling on a DIY steel building, ask yourself some questions:
What are your needs and intended uses?
How much room will you need for tools, equipment, vehicles, and open space to move around and work?
Do you want to be able to pull through (have a garage door at either end)?
Do you want one or more pedestrian doors and windows?
Do you need a concrete slab (this may be required by your local building department) or a stem wall with a gravel or dirt floor?
Also, consider your building site, including slope and drainage.
Read reviews for various steel building companies. Some provide better support during the building process than others.
On our off-grid property, we planned to have a solar panel array along the south side of our building and house the battery bank inside, so this affected both the design and orientation of the steel building we chose.
Talk to multiple suppliers, even if they're out of state, and get several quotes. Especially if you'll be building it yourself, you'll want to have great customer service, so it's not just about making the sale.

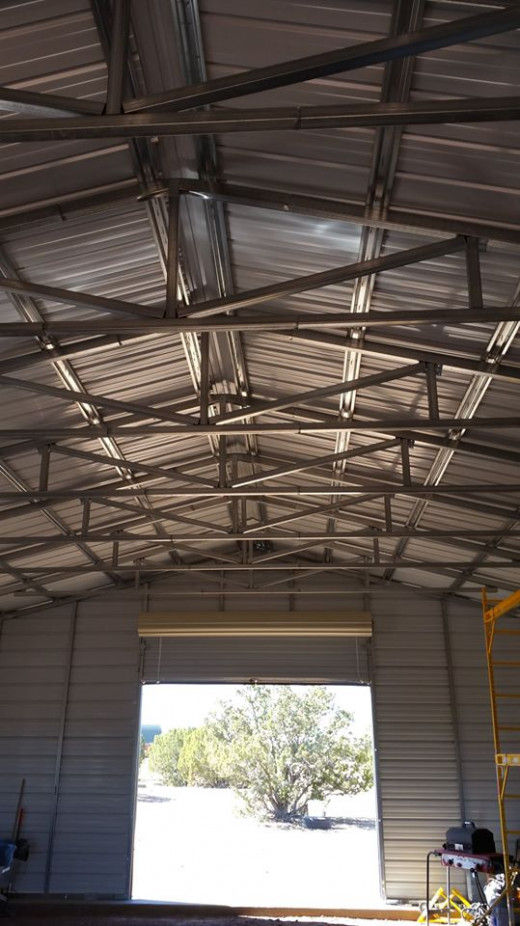
This is a photo we found when we were looking at steel buildings online. We based our design on this one, although ours would have an overhang only on one side. One thing we learned the hard way, though, was that snow load requirements in our area meant that our overhang, unlike the one in the picture, would end up with trusses. Those trusses made the building process much more complicated, including putting up the steel siding on that side of the building. You'll see later on....
Is it Really a DIY Project for You?
When my husband and I were in the process of selecting a building and deciding which company to purchase from—and even early on, after we'd purchased the customized kit—we were confident we could do this on our own. We watched a number of YouTube videos (don't you just love YouTube for learning how to do just about anything?) and videos made by the manufacturer, and we really thought we had it handled. I mean, the two young girls in that one company video built theirs no problem! So we were golden.
Not so fast.
With a roof peak height of 14.5 feet and eave height of 11 ft., plus the weight and unwieldiness of some of the parts and pieces, the rafters and roofing, not to mention our lack of experience, we soon realized we were in over our heads.
For example, the uprights, rafters, and roof trusses had to be assembled on the ground and each section raised into place and lifted to fit down onto the base rail (if that makes sense). Two people on their own can't raise, move, and lift one of those.
We definitely needed help.
Luckily, some neighbors came to our rescue, one of whom brought a large bucket loader, which we used to lift and raise each assembled piece, while a person on either "leg" guided it into place. Here's a photo of the end result, once all uprights were raised...

When thinking seriously about whether you can build your steel building yourself, or with whatever crew of family or friends you have, consider:
Size and height of the building
Complexity (i.e., trusses, overhangs, etc.)
Previous building experience (of any kind)
Time (yours that is)
Tools and equipment (What do you have on hand, and what will you need?)
Local Building Codes and Permits
Before you buy and build anything, check into local building codes and find out whether the size and type of structure you plan to build will require a permit and, therefore, an inspection. If you live within an HOA or POA, you'll want to check on CC&Rs that might apply.
Things that affect your project and whether you'll need a building permit include:
Location: Are you within town or city limits? On a rural property? What's the zoning?
Size: Buildings under a certain square footage may not require a permit.
Foundation: Does building code require that the size and type of building you want be on a foundation, and if so, what type? A footer? Stem wall? Slab? Other?
Snow load: Requirements in your area can make a difference in the type of framing (rafters, trusses) and roofing you'll need.
Delivery or Pickup?
Consider whether you'll have your steel building kit delivered to your building site or pick it up. Delivery can add quite a bit to the cost, but pickup won't always be an option. In our case, we decided to use our 20-foot trailer to pick up the building parts, making sure beforehand that the longest pieces would fit on the trailer without excessive overhang.
Rather than pay what would have been a $500 delivery charge, we drove 2.5 hours (each way) to Phoenix to pick up the kit and roll-up garage doors, which the company loaded onto the trailer for us. While we were able to offload the building parts by hand, be sure to have equipment (i.e., a forklift) on hand if you'll need it to offload the kit at the building site. This applies whether you'll have your building kit delivered or will pick it up yourself.
Tools and Equipment
For our building—and others from the company that sold it to us—these are the tools and equipment we needed:
Hand tools
Impact drivers (drills)
with extra batteries if cordless
bits (our tens of thousands of tek screws were 5/16ths)
Hammer drill, if you're drilling into concrete
Wrench
We mostly used this for tightening bolts and also for bending out the pinched ends of cut pieces of metal framing.
Angle grinder
Tin snips like this (We got a set of three with left, right, and straight snips, and used them all for the building.)
String/plumb line
Two-food level
T-square
Tape measure
Speed square, like this one (I recommend a metal one, not plastic.)
Clamps
We needed a LOT of clamps of various sizes and types, in part for holding siding and metal roofing sheets in place, among other uses. At one point, we had about a dozen clamps on the building.
Ladders, Scaffolding, and Lifts
Eight- and 12-foot step ladders
Stackable 6-foot scaffolds (We needed four to be able to create two sets of 12-foot scaffolds at a time.)
Man-lift (We rented one for doing the roof, but it was awkward to use and ultimately not worth the money.) A scissor lift would have been better, but we couldn't get one for outdoor use in our area at the time.)
Miscellaneous
Tool belt
Work gloves
Safety glasses
Magnets like this (strong ones for holding the string for our straight lines, even better with eye bolts)
Permanent marker, pencil
Getting Started
Often, even when doing it yourself, you'll need a subcontractor to do the foundation work. In our case, given the rural location, we had to contact numerous companies, big and small, and ask other local landowners for recommendations before we found a subcontractor willing and able to do our foundation. He and his crew did a great job, but we did have to be patient and wait a few months for them to get to our project.
In the photo below, you'll see our perfectly level stem wall — so we had a great base to start with — the four caissons for the overhang pillars and the packed gravel floor.

Before You Start Building
Take your time. Don't rush into the building process before you make sure you have everything and do some quality control. I speak from experience here ... and learned this the hard way when we were well into putting up the building. So don't do what we did. Instead...
Lay out parts and pieces. Using the parts and packing list you should get from the manufacturer, ensure you have everything, right down to the smallest hardware. (We ended up having to call the company and have them ship and sometimes overnight multiple missing items, multiple times, as we discovered what we DIDN'T have ... right when we needed it.)
Count and measure. For all batches of the same parts, count and count again. Are they all there? And are they all the exact same size? Even a quarter inch--definitely a half-inch--can make a noticeable difference if a rafter isn't the same length as the rest. If it's too long, at least you can trim it to size. Too short ... well, that's a bigger problem.
Measure again. If you look closely (or even not-so-closely) at our roof, especially when the sheeting is in place, you'll understand why I say to measure again.
Duplicate. Here I'm referring to something like assembling trusses on the ground. Do it the same way each time. Stack them on top of each other. Are they exactly the same?
Level. Pretty self-explanatory, but take the time to make sure things are as level and plumb as can be, every step of the way. If multiple people are working on your building, you may each want to have a level. Make it your friend.


Checking As You Go
As mentioned above, measuring carefully and checking that things are level both horizontally and vertically is really important and worth the time. It can really save you time in the long run and a lot of headaches as your building progresses. Hat channel on the roof relies on the rafters being level and evenly spaced. Roofing relies on level rafters and hat channel. Garage doors will be an even bigger challenge to hang and have function properly if your door jambs and headers aren't correctly spaced and level. And so on and so forth.
In the photos below, you'll see that the overhang framework was added. This affected the leveling of the main frame of the building, so we had to recheck every upright and rafter and make some adjustments. In the second photo, the siding starts going up. If your uprights aren't level and in line, your siding will be wavy (like ours).


Mistakes We Made ... and Want You to Avoid
Here are some goofs we made—most people wouldn't notice most of them, but I know they're there—and things we learned the hard way. Some we could fix; others are goofs there to stay.
1. When adding the overhang, the inconsistency in the angles of the trusses threw off the level of the roof line. We had to make some adjustments while on ladders and scaffolds, removing tek screws, shifting parts and plates, and screwing them back on.
Also, the addition of the overhang shifted the frame of the main building a bit. Had we installed the hat channel on the roof beforehand, this would have stabilized the building, and there would have been little to no shift. Problem was, the manufacturer had forgotten to put the hat channel on our trailer when we picked up the building, and we hadn't noticed soon enough. At this point, we were still waiting on those to be delivered to us (at no extra charge to us), so we continued building out of what should have been the order.
Another good point to stress is making sure you have all parts and pieces on hand BEFORE you begin.

2. Here you see the hat channel, which we finally received, going on the roof. If your building is similar, be sure your spacing is even and that the hat channel is level. If any of them are off, you'll notice it when you put your roofing on. That steel sheeting doesn't hide imperfections very well at all.


3. Did you know that siding has a right side up? We didn't. And the instructions that came with the building were not clear on that bit. We overlapped the ridges and did our best to make sure the siding was going up evenly (from side to side) and level, but we had no idea our siding was upside down until an experienced neighbor-helper-friend pointed it out ... when the siding was almost finished. Does it make a significant difference, though? To us, not really ... although the seams are more significant with the siding upside down.
4. This wasn't a mistake, just something to think about. If you'll need to trim siding or cut it to the shape and slope of the building as we did, you'll either need to put it up temporarily to measure and mark, and then take it down to cut, OR put it up and cut it while in place. The manufacturer recommended the former. We chose the latter. We put it up and then used our angle grinder and tin snips to trim and cut it in place.


5. (Above) Remember I said that the overhang trusses made putting up the siding more of a challenge? You can probably see why in the photo, given how the trusses and rafters of the overhang connect with the building. Having horizontal siding made it MORE complicated, but even vertical siding would have required a lot of additional measuring, cutting, and maneuvering to get the siding up there. Even the manufacturer hadn't thought about that, and there were no specific instructions included. A follow-up call didn't help. So we figured it out on our own.
So, another thing to think about when choosing a design. Also, the overhang and the extra space created by the hat channel between the rafters and the roofing means there's a gap of a couple of inches between the top of the siding and the roof. That's not really an issue for us, especially since our building is not insulated or supposed to be air-tight. But if that's an issue for you, consider how any overhangs will affect your building in that way.
6. (Below) When it came to the posts and tri-header for our overhang, we had a few issues that came together to create a problem. First, while the concrete caissons on the ground that we started with were perfect (thanks to the subcontractor), we didn't place the posts in exactly the same way on top of the caissons. Second, we didn't notice (because we didn't check carefully enough from the get-go) that one of the steel posts was not straight. It had been welded to its base a bit off, so it was bent a bit. That meant that the top of the post ended up leaning about half an inch to the side, which in turn meant that the spacing between the top of that post and the next was thrown off. Since those tri-headers you see in the photo were cut in order to meet in the middle of the top of each post, one tri-header ended up barely sitting on top. We had to add additional plates to ensure it was secure.
You can see what I mean in the photo below, which shows the setup before we added the extra plates.
7. (Below again) It may be a little difficult to see in the photo, but there's a bit of a wave to the roofing. That's because those rafters aren't exactly even and level with one another. Like our other goofs, it doesn't affect the strength or stability of the building, which is held together with thousands of tek screws, but aesthetically it bugs me (I'll get over it ... eventually).

Also, if you look on the far right, you'll see that we have one bit of roof sheeting to go, which will need to be cut lengthwise to fit. Thing is, it's not an even cut because that last bit is narrower at the top than the bottom of the roof/overhang. That's because we were off when we started from the left end of the building. Which is because my husband (shame, shame!) didn't carefully measure things, and the error continued down the line. While we made the adjustment on that last sheet on the right and cut it at an angle, it's yet another "imperfection" in the building ... that I know is there. So keep in mind that one goof can carry through to create others.

Bay Doors: A Challenge of Their Own
Beware of roll-up doors, which have springs. Those things can be dangerous, so make sure you're clear on the instructions and are very careful when installing. Experienced help is a big plus. These things are heavy, too, so either have the proper equipment to raise the door(s) into place or come up with a pulley system like we did (sorry, I don't have pictures of that). In our experience, it takes three people (four is better if you have the help) to raise and install these doors, especially if you're a novice.
You really want to ensure your door openings are the right size and the jambs and header are level, or you'll have difficulty installing the door(s). For one of ours, we had to add a steel extension on one jamb because it was too narrow to screw the door bracket into it.
Properly tensioning the springs is also tricky.

DIY Steel Building Project Complete: Not Perfect, But Solid
All in all, considering the number of issues with quality control on the part of the manufacturer (parts cut incorrectly), missing parts and hardware that had to be shipped to us along the way, our lack of experience and our lack of care when it came to double-checking the lengths of parts, our own measurements and the level, the building ended up looking quite good overall, and it's definitely sturdy. We passed the county inspection with no problem and have been making good use of and enjoying our building, which is the first on our property.
But there are a number of things we know now that we didn't know when we started and would do differently (or more carefully). If you have any questions about our experience with purchasing and building our steel workshop, please feel free to contact me or leave a comment or question below.


This is an incredibly honest and practical DIY steel building guide—thank you for sharing the real challenges, not just the highlights. Your points about checking parts before starting, respecting snow-load design changes, and constantly re-checking level and alignment are especially valuable and often overlooked by first-time builders.
I also appreciate the realism around needing extra help and equipment despite good planning. The mistakes you shared (hat channel order, siding orientation, overhang complexity) are lessons that will save future builders time, money, and frustration. Solid, experience-based advice that anyone considering a DIY steel building should read first.